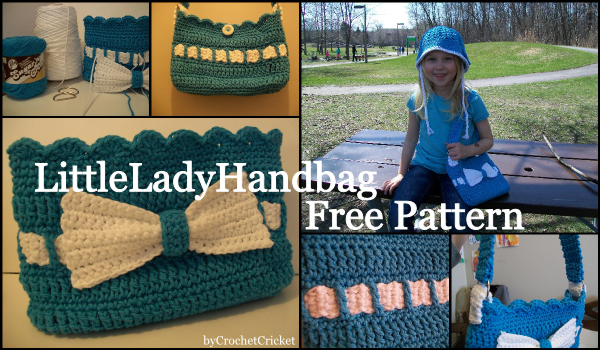
This is a pattern that I designed back in 2012-2013. I have decided to bring it over here to my new site for everyone to enjoy. This pattern does not include a lining tutorial. I will probably add some tips on how to structure your bag in a later version of this post. For now, I would recommend that you try to have a good dense fabric for this like a nice sturdy cotton yarn.
Materials
- 5mm hook (for medium size bag)
- 4mm hook (on all parts of bow, and for small size bag)
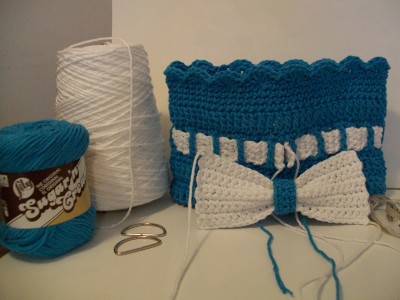
- 2 contrasting colors of yarn worsted weight (I used sugar n’ cream 100% cotton in white and hot blue)
- needle to sew in tails
- two metal rings for straps
Pattern for main body of bag
US Terms
Make a Slip Knot Chain 23

Round 1 – this is the round you need to pay the most attention to in order to get your corners right.
- sc in next 21 ch
- 5 sc in last ch
- working on opp side of ch
- sc in next 20 ch
- 4 sc in last stitch (there will be one stitch already in this chain.Your beginning stitch) (50 stitches)
- join with sl st in first sc.
***at the beginning of rows 2-3 you will do your first sc into the same stitch that you sl st into to join the previous round**
Round 2 – CH 1. Sc in next 22 sts. 3 sc in next st. 1 sc in next st. 3 sc in next st. sc in next 22 sts. 3 sc in next st. 1 sc in next st. 3 sc in next st. join with sl st in first sc. (58 stitches)
*you are simply adding 2 stitches at each corner to make your work turn*
Round 3 – Ch 1. Sc in next 23 sts. 3 sc in next. 1 sc in each of the next 3 sts. 3 sc in the next st. sc in next 24 sts. 3 sc in next st. 1 sc in each of the next 3 sts. 3 sc in the next st. 1 sc in the last st. join to 1st sc with sl st. (66 sts)
*These three rounds make the base of your bag*
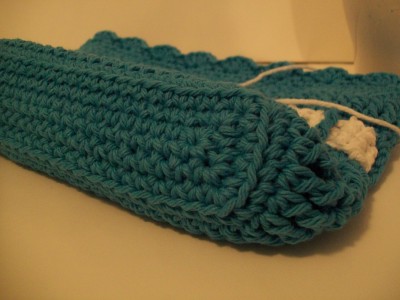
Round 4 – sc around working in back loops only. (66)
*Ch 4 will count as first Treble stitch for every TR round. For a small size bag you can replace the TR with DC. If you choose DC ch 3 at the beginning of rounds. Counts as first DC throughout. You will still use TR stitches on the row with chain 1 spaces where you weave your band into.*
Round 5 – ch 4. tr around. join to top of chain. (66)
Round 6 – ch 1. sc in same st and around. join in first sc. (66)
*you are alternating between rows of tr and sc*
Round 7 – rep Round 5
Round 8 -rep Round 6
Round 9 – ch 5. sk 1 st. tr in next st. ch 1. tr in next st around. leaving one chain between each treble stitch around. Join into the 4th st of your beginning chain 4. (66) 33 trebles and 33 ch 1 spaces.
Round 10 – ch 1 if you can do your sc in the same space do it. If it is too tight work it all the end of the round. Work 1 sc in each treble and 1 sc in each chain space (not into the chain itself). (66 sc)
Round 11 – ch 4. 1 tr around. (66 tr)
Round 12-14. ch 1. sc in same st. sc around. join. (66) except the last stitch on row 14 you will do a sc2tog. (65 sc at end of row 14 multiple of 5 needed for hdc shell edge).
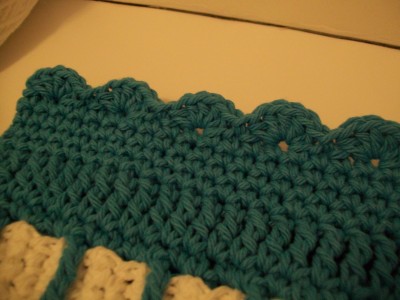
Edging – sk 1 st. 5 hdc in next st. sk 1 st. sl st into next st. 5 hdc into next st. rep. End with slip st into the last sc of your last round.
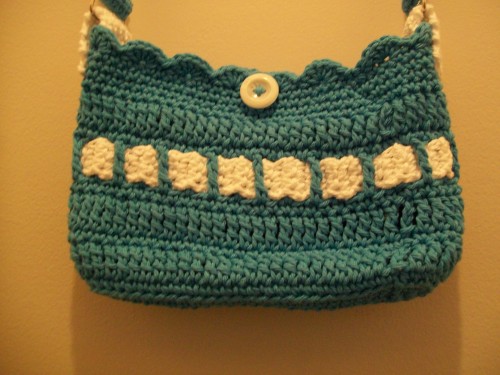
I have made this bag with acrylic and with cotton. A soft acrylic is nice for the band and bow. I prefer cotton for the bag it gives it more structure.

Here is an example of a cotton bag and a soft acrylic bag made with something like Red Heart shimmer. There are also 2 rows less in the pink acrylic bag. Row 4 is not in the shorter bag and there is one less row at the top of the bag. The pink bag was also made with a size 4 hook making it smaller. If you want your bag to be for a smaller child you can make yours like this.

The blue cotton bag laying flat, made with a 5mm hook measures 10in x 7in.
The pink acrylic bag laying flat, made with a 4mm hook measures 9in x 5.5in.
Band
ch 4 sc in the 2nd chain from the hook and the next 2 stitches. (3 sc wide)
work rows of 3 sc until your band can be wrapped around your bag. Do Not fasten off until after you have woven your band through the chain one spaces and verified that the length is correct. If you need more length or less you can continue simple add or pull out the rows while the band is in the chain one spaces. Sew the two ends of the band together.
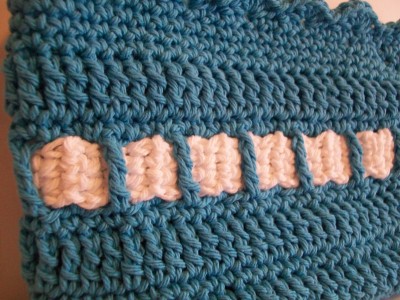
Here is what the back of the bag looks like with the band
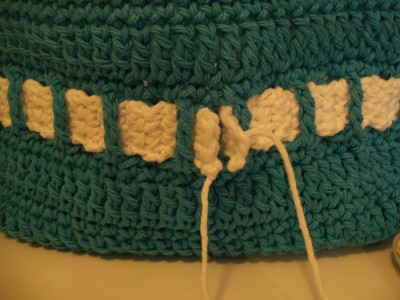
How to weave in the band?
Laying flat I can count 18 treble posts. I began weaving my band in under the 9th treble in either direction. This should be the middle front of your bag. You will go under the first treble and over (hiding) the next treble. You should end your weaving with your band under the last treble if you have the right number of posts.
This is where you will attach (the cc ring you made for your bow) your bow.
Bow
*use 4mm hook on bow
ch 21
work 10 rows of 20 sc crochet. Leaving a long beginning tail and ending tail of opposite sides of the bow to help you attach the bow to the bag. For fuller bow do 2 extra rows.
With CC ch 12. sc in 2nd ch. sc to end. (11) Make 3 rows. Fasten off. sew ends together to form a ring. Do not overlap. I use a whip stitch. I also do it with both tails.
Take your rectangle (bow) and fold it like a fan. Pinching it in the middle then folding down the two tops. Insert this into the ring you made. Position the ring in the center of the bow and shape the bow. Keeping the back of your ring to the wrong side of your bow.
Attach to the band using your tails in the same place you joined your band.

Closure
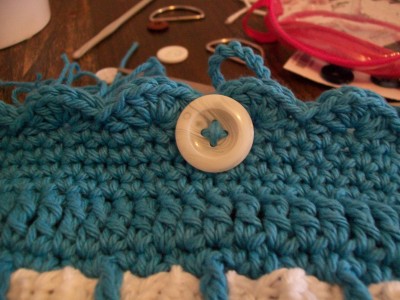
For this bag, I decided to do an easy button closure.
I did not want to put the button on the front of the bag because it would compete with the bow for attention. So I decided to attach it to the back. I am calling this a ‘back button closure’. This is how it looks.
Using your 4mm hook
Depending on the size of your button. Chain around 15 stitches then slip stitch into the first chain. Leaving long tails.

You will attach the closure to the front side of the bag between the two shells on the inside. Near to the top of your bag. I brought the tails to the ‘right’ side of the bag crossed them, then re-entered them to the inside of the bag to secure.
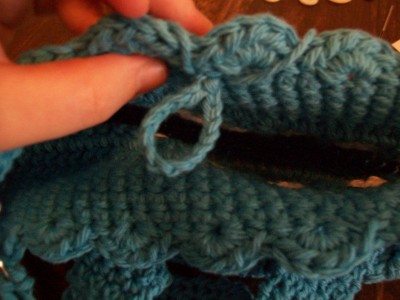
Make a double knot. Be careful not to distort the front of the bag by pulling too tight. Then run your tails under the sc to hide before cutting off.
Add a button to the outside of the bag opposite your closure loop. Near to the top using the same yarn as your bag.
And that’s it. Pretty simple way to make a closure for you bag.
This time I have used what I am calling a hidden back button closure.
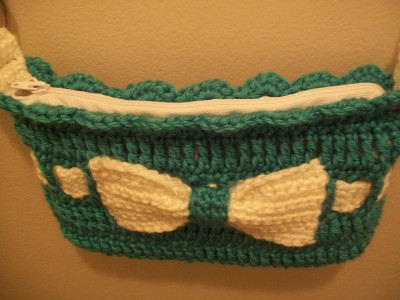
I used a button closures for this bag. On a previous bag I added a zipper by hand – here is how it looked.
Closure
For this bag I decided to do an easy button closure.
I did not want to put the button on the front of the bag because it would compete with the bow for attention. So I decided to attach it to the back. I am calling this a ‘back button closure’. This is how it looks.
Using your 4mm hook
Depending on the size of your button. Chain around 15 stitches then slip stitch into the first chain. Leaving long tails.
You will attach the closure to the front side of the bag between the two shells on the inside. Near to the top of your bag. I brought the tails to the ‘right’ side of the bag crossed them, then re-entered them to the inside of the bag to secure.
Make a double knot. Be careful not to distort the front of the bag by pulling too tight. Then run your tails under the sc to hide before cutting off.
Add a button to the outside of the bag opposite your closure loop. Near to the top using the same yarn as your bag.
And that’s it. Pretty simple way to make a closure for you bag.
Copyright© 2021 Crochet Cricket.
Do not copy any part of this pattern. If you would like to share this pattern please provide a link to this post. If you would like to make products to sell, please include a credit to the designer for your work. Enjoy!